Archive for the 'Hard Mode' Category

Heroic: Professor Putricide

So I finally remembered to take some screenshots and by some I mean one, which does helps to illustrate one of the points I wanted to make. It’s so very hard for me to remember to take screenshots mid fight as quite frankly my mind really isn’t thinking about it with everything else going on. There’s also the challenge of getting into the right position to take the screenshot so that it illustrates my points effectively which again is challenging. However I am happy to say I can finally make this post as I think the shots are adequate! The screenshots are from different kills (one as resto one as kitty) in case you were wondering why it looks different.

Heroic Professor Putricide

From a progression point of view, this is probably one of the last bosses you will want to take on but I do like the heroic mode concepts of this fight which is why I wanted to discuss this second. Also by this time I would assume many people have already gotten to or near the end of Heroic ICC10 so this may be a good time to discuss PP as some folks out there may find this useful in their efforts to progress in ICC 10 heroic.

Normal vs Heroic Mode

There are several unique changes to this fight:

  1. PP gains an ability called Unbound Plague (Inflicts damage every 1 sec, the damage is increased every second the Blight remains on you!  If you get too near to a friendly target, you will transfer the Plague from you to them.)
  2. PP will no longer Tear Gas during transitions (80% & 35%) instead he will spawn both Gas Cloud & Volatile Ooze at the same time

The challenges that are introduced naturally are the management of Unbound Plague and also the management of both cloud/ooze at the same time during the transition.

Keys to the Fight

  1. Quick Add Switches
  2. Unbound Plague Management
  3. Transition Control

The first point is true for whether you are doing PP on normal or heroic. Its very easy (and I’m definitely one of “those” people) to just sit on PP and nuke his ass to rack your meters up. But to do this on heroic mode you have to have the discipline to be ready to switch as soon as adds spawn and take them down quickly. The faster they die, the less damage done to your target and less chances that the raid will take unnecessary damage, the happier your healers will be.

Unbound Plague is probably the primary reason that most guilds will wipe to this. It is a debuff that deals damage to  a specific target and continues to increase in damage until it is dropped off onto another raid member. Once it is dropped off the prior target will get  Plague Sickness which will increase shadow damage by 250% so essentially you are unable to take the plague again. Thus it is critical to continue dropping the plague off to other members of the raid until the plague duration has worn off (1 min total).

During transitions the management of both Ooze and Cloud are extremely important, the positioning of the raid and dps priorities are critical to ensuring that the adds time in a timely fashion while at the same time mitigating the damage taken by the raid.

Composition

Similar to Saurfang, we used a 2 tank, 2 healer, 6 dps group composition. A resto druid really shines in this fight as the ability to prehot the raid during transitions significantly helps to reduce the chance of getting exploded by Volatile Ooze.

Strategy

Many aspects of the fight in normal can be applied to the strategy for heroic mode. You’ll still need to be rotating from left/right tanking PP on the opposite side of where the ooze is going to spawn. The key is to have your raid spread out so that the initial application of Unbound Plague is only applied to one person. We generally try and stand in a straight line so that there is no confusion as to who the plague is getting dropped on. Depending on how much range you have, this will dictate how long you hold the Plague for. If you have a lot of range you can drop the plague every10s if you have only a few range drop it every 15s.

Note the red line I've drawn through all the range in the raid. Notice how clear it is the path in which the plague will travel. In this case, I was the first person to get the plague (notice the debuff) and I just dropped the plague off to our hpal to the left.

Timing of the transitions is naturally important (just like in normal mode). Make sure you don’t bring PP in just as he’s casting another add as there is the potential of getting a 3rd add (we got 2 ooze and 1 slime once!). Once he does go in though, the key is to immediately stack right on the spawn point of the Volatile Ooze (Green). The reason for this is so that as soon as it becomes active, everyone must immediately start dpsing. You wont be able to kill it before it selects a target so it will explode on you. This is why its important that you all stack and face the same direction. Once everyone is pushed back, if the raid was facing the same direction you should all be close to each other so that you can quickly run back to the next target that the ooze will select. Do not kitty charge back in as being there first is not important, in fact being there before anyone else most likely will mean you’ll get instagibbed since the rest of the raid is not around to soak the dmg dealt.

At the same time that this is going on, one of your raid members will also get targeted by the Gas Cloud, the target selection should happen right around the same time that the Volatile Ooze selection happens so the target should get pushed back just as they get targeted. This person should start kiting the Gas Cloud as you would in normal while the rest of the raid deals with the Ooze. So in other words, the priority is Ooze (Green) -> Cloud (Orange). Once both adds are dead, you will have free reign to move around and in most cases, time to pump some extra dps into PP. He will be stationary so you should get over to him and hit him up.

This is us grouping at the first (80%) transition. Notice the folks in the green box are stacked right on top of the green ooze. Also note that the healers (in red box) did not, on this kill we did not use a resto druid so they stayed out to continue healing. Also notice the hunter (in red box) that is way off to the left, this is a prime example of what NOT to do.

As mentioned above the transition will happen twice (80% and 35%) and the unbound plague will happen throughout the fight (p1, p2 and p3). There is a cooldown on the plague (I believe 1 min) so there will be periods in which you will not have to worry about the plague. Once you reach P3 it will be exactly like normal mode + unbound plague. Again make sure you spread out, and manage the plague accordingly and that’s all she wrote.

Other Tips

  • Unbound Plague can be cast on anyone including melee and tanks, when it is about to be cast (off cooldown) make sure the whole raid spreads out including melee so that it is not accidentally spread to several people at the start. It is more important to ensure that only 1 target gets it vs pushing dps
  • If a melee gets the plague first, have them immediately drop it off on a ranged so that they can go back into melee range and continue dpsing w/o fear of dropping the plague on another melee or tank
  • All ranged should spread in a line so that it is clear who is taking the plague next, and to ensure that it is not applied to any extra people
  • During transition, try your absolute hardest to not only fact the same direction, but stack as if your raid were one person so that the angle at which they are punted back is exactly the same. If someone is facing slightly to the left or right they will get punted out off on their own which can cause problems
  • If an unbound plague target is selected by the volatile ooze, have someone quickly pull it off them so that if stacking is required the whole raid does not get the plague, and so that the target does not take plague + ooze damage at the same time. Naturally the person that steals it should stay out of the raid group and soak the plague while the rest of the raid kills the ooze.
  • As Kitties, always try and get a fresh set of dots up on PP before transitions so that they continue to roll as you deal with adds. However do not put them up at the expense of using all your energy is dpsing adds has higher priority to dpsing PP
  • Use Feral Charge generously to jump back to PP after dealing with adds

Up Next: Heroic Sindragosa (if I can remember to take screenshots!)

Heroic: Deathbringer Saurfang

Its been just a little over a month since our 10 man group took Arthas down and since then we’ve been busy working on hard modes. We’ve tried to avoid changing our play schedules to push hard modes because quite frankly we are at heart a casual bunch and we know once we get to Heroic Arthas we’ll be stuck for a while so whats the rush! So far we’ve been pretty successful sitting at 10/12 ICC 10 hard modes complete. Sindragosa was the most recent one to fall after some really frustrating nights. That only leaves Heroic Putricide and Arthas left.

Heroic Deathbringer Saurfang

The first ICC10 hard mode discussion will be Heroic Deathbringer Saurfang. While he may not be the first boss in the instance, I felt this would be a good one to start with as he is the first boss that drops ilv 264 tokens for T10 and most likely the one that is causing people a lot of problems early on. I’ve also decided on a slightly different structure as opposed to some of the prior hard mode discussions I’ve had, hopefully they provide better insight.

Normal vs Heroic Mode

The mechanics of the fight in heroic mode are essentially the same as in normal mode. The one major difference is Blood Beasts now have an ability:

Scent of Blood: Saurfang’s Blood Beasts catch the scent of blood, reducing all nearby enemies movement speed by 80% and increasing their damage by 300% for 10 seconds.

Keys to the Fight

  1. Blood Beast Control
  2. Minimizing Blood Power Gain
  3. Balancing Control vs DPS Output

Blood Beasts are the most challenging piece of this heroic mode. In normal mode, you have full mobility to kite them or in worst case scenarios let them wack you and let Saurfang gain Blood Power. In Heroic mode, this is not an option as they cannot be kited due to Scent of Blood which reduces your mobility. If they do manage to catch you, it is essentially a wipe as they will in most cases, one shot the target. Without any mobility, more creatives ways to manage the adds must be used (more on that later).

Blood Power is more of a side effect on normal mode, where letting Saurfang gain some here and there isn’t such a bad thing and might not necessarily cause a wipe.  In heroic mode its extremely important to try your best to minimize the gain. The more he gains, the faster he’ll cast Mark of the Fallen Champion, anymore than 2 and you’ll be in for a tough ride.

Finally, and most importantly balance. You need enough control to manage adds, but you also need enough dps to kill Saurfang. If you control too much you wont have enough dps to kill Saurfang, and vice versa if you have too much dps on Saurfang, you wont have enough control to kill adds. Every group is slightly different but you need to find your balance to see what is the minimum amount you need to control while dpsing to your fullest.

Composition

First and foremost, we used a 2 tank, 2 healer, 6 dps group composition. A 3rd healer is too much control and not enough dps which will cause Saurfang to get too many Mark of the Fallen Champion which will become unhealable. How your dps is split is up to you and irrelevant. If you’re wondering, our composition is 2 ranged (hunter/spriest) and 3 melee (arms war/ret pally/unholy dk).

Strategy

As mentioned above, the main challenge of this fight is to control the Blood Beasts. When they spawn, they are fast little buggers so you need to use what abilities are available in your raid to slow them down. We use a “criss cross” type strategy where essentially we force the adds to cross paths (close to each other) which enable us to AOE stun (Warrior Shockwave) to lock them in place. Our ranged then focus on one add (for us always the left one) and I root the right one. That gives our ranged extra time to single target the adds down one at a time. Most likely the target add will still be able to reach their target before it dies so we use aggro dumps and taunts to bounce the add back and forth until it dies. At which point the focus will be switched to the rooted blood beast, naturally similar bouncing techniques are used again for the second add.

The positioning of your ranged is quite critical to the success of the strategy as it will affect which direction your blood beasts will travel. We generally put our healers in the middle so that the initial aggro will force the blood beasts to naturally criss cross or at move in the same direction. Our ranged are spread far left and far right to maximize the distance that the blood beasts will have to ping pong back and forth which again extends the amount of time. Finally and most importantly the blood beasts may not always criss cross naturally so our hunter (on the right) will always pull aggro on the initial target (on the left) which will further force them to criss cross and allow for a stun.

Dps highlighted by red boxes, Healers highlighted by green boxes. Notice the spriest is applying mind flay while the hunter nukes the loose beast (which is going after our hunter on the right) The other beast is rooted at 100%

It is important to note that the blood beasts are stunned/rooted OUTSIDE of cleave aoe. If your melee are in range and pull aggro it will make things a lot more difficiult.

A typical chain of events would be.

  1. Hunter drops Frost Trap on spawn point
  2. Adds Spawn and move towards ranged (generally healers)
  3. AOE stun to lock them in place
  4. Entangling Roots on right add (locked until the other add is dead)
  5. Spriest/Hunter dps add, slowing it via Mind Flay, Concussive Shot
  6. Beast will target hunter (Midsirection for aggro if necessary), and when it gets close, hunter will Feign Death
  7. Beast will go towards the spriest and die before it reaches
  8. Switch to second beast, again will go after hunter
  9. Ret paladin will taunt as it gets close to hunter/Hammer of Justice if necessary
  10. Add dies

As you can see, from the series of events its essentially bouncing the adds back and forth until they are dead. Its important to be extremely vocal to ensure that all parties are aware of where the adds are and who they are going after. Naturally, not every raid group will have the same composition but depending on what you have you can use different strategies. For example, this week we didn’t have a warrior tank so we used a warlock Shadowfury to aoe stun in place. It is important to note that only two dps are used to kill adds, having 6 dps total is meant to speed up the fight to avoid getting extra Mark of the Fallen Champion. If you put too many dps on adds you won’t be able to bring him down fast enough.

Other Tips

  • Turn Saurfang so that he faces the door, it helps to increase the kite distance slightly
  • Ensure that your ranged are max ranged to maximize the kite distance, as soon as Scent of Blood is cast he/she wont be able to move
  • If you have paladins/priests, feel free to use Blessing of Protection/Shields to reduce Blood Power gain
  • If you are feral and rooting, try and time your rips so that they are applied before Beasts spawn so that you don’t lose much time and you also have an instant root!
  • As the person rooting, it is imperative that you keep an eye on your rooted target to ensure that it does not break lose or if your ranged need assistance that you chain root it to help them out.

Thats it for Saurfang, up next Heroic Marrowgar!

Gotta Go Anub’arak

I woke up this morning to realize that we’re already into October, the year has flown by faster than I could have imagined. A couple of weeks ago I was still enjoying the summer playing a round of golf on Sunday and now it’s so cold outside that I’m ready to bust out a winter jacket. Cold weather means more time indoors and more time indoors means more blogging so I guess it’s a win win situation. Today’s topic will be Anub’arak 10 hard mode. I really don’t feel that there is a need to discuss any of the other hard modes (or normal modes) in TOC because quite frankly they’re not that hard and there really is no difference to how it’s done on normal mode.

Anub’arak Hard Mode

The following are the added changes to the fight in heroic mode:

For a complete summary of all of Anub’s abilities check out this link here.

General Tips

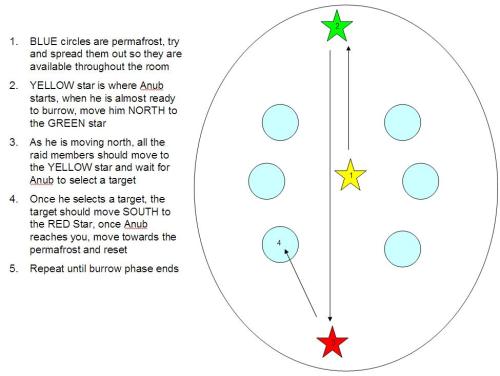
  • The biggest difference between Normal Mode and Heroic Mode is the management of Permafrost to stop his Pursuing Spikes. When he is about to burrow, you want to move him off the Permafrost and move towards the North and let him burow as far North as possible. Your raid should all move to the middle and wait for him to identify a target. Once the target has been picked, the target should beeline South as far as possible to again maximize the distance and the amount of travel time Anub has. By the time he reaches the targeted player he would have already travelled all the way from North to South essentially eating burrow phase time. The player should then allow him to hit Permafrost and identify a new target. Once a new target is picked the target should now move all the way North (since Anub is all the way South) and repeat the process. By doing this Anub should only target 2-3 people (depending on how efficiently you do this).
  • When kiting, be cognicent of where your Permafrost is, DO NOT blindly run in the opposite direction as if there is a Permafrost inbetween you and Anub, he will hit it and reset targets.
  • During the Burrow phase (P2), everyone should always be in the middle for several reasons. First it makes sure that if you are kiting him north or south, it will ensure there is sufficient distance for the person to run away. Secondly, it enables better management of Swarm Scarabs, ensuring they do not kill a healer and are aggroed onto a tank and can be taken care of as fast as possible. Lastly, as mentioned above, if there is Permafrost directly between you and Anub it will eat it and cause a reset, staying in the middle ensures a clear path for Anub to chase you.
  • If you have a paladin in raid you can use Blessing of Protection to sustain the kiting once Anub has reached the target. Personally once I get a BOP, I like to run circles around Permafrost until my BOP runs off 🙂
  • In Phase 3, minimize the amount of healing you give to the raid. If you have a Paladin or Druid for Leader of the Pack of Judgement of Light, you should need very little raid healing. The more you heal the raid, the longer Phase 3 will persist due to Leeching Life which steals 10% of the raids health every second.
  • In Phase 3, you’ll want to kill off the set of Nerubian Burrowers that are up when you enter P3. However when the next set of Nerubian Burrowers spawn, you’ll want to start off tanking them on Permafrost and then midway you’ll want to move off and allow them to submerge. This essentially lets them go off and do their thing while it gives you time to finish off Anub.
Extremely ghetto diagram

Extremely ghetto diagram

Kitty Tips

  • As always, pop Berserk early so that it can be used again. Specifically you want to use it again in phase 3 once he begins to use Leeching Swarm and this is where your dps matters most.
  • In phase 2, many classes will get stuck on Permafrost, use Feral Charge generously to jump from add to add and kill them as fast as possible.
  • In phase 2, if you find yourself in a bad spot and you are too close to Anub and he is about to hit you with Pursuing Spikes, look around for Swarm Scarabs and try and Feral Charge them so that you can get a bit more room between you and Anub. Generally speaking you should be nowhere near Anub but in case it does happen, you have this available to you.
  • Stay on Anub and let other classes cleave the Nerubian Burrowers. Kitties have terrible startup time and the amount of time you need to swap between targets will really hurt you in the end. There are a lot of other classes (rogues/dk’s etc) that would be much better suited to handling the adds.
  • From what I’ve seen so far, I don’t think dots carry forward into his burrow phase, which is the opposite of how Anub was in Azjol’Nerub. You’re better off hitting him with a Ferocious Bite at the end and not leaving up any dots.

tribute10

So far we’ve been missing A Tribute to Mad Skill by only a few attempts (43 tries left last 2 weeks), looking to make a push this week. stay tuned!

Algalon has been… Observed.

Alright sportsfans, I’m finally (and I do mean finally) happy to report back that we have finally managed to defeat Algalon. It’s been a long time coming and I really wish we had put more effort into this but it’s been extremely challenging to get people to put in the time to learn this fight and execute. We’ve had approximately 3 months worth of timers available to us however we’ve only put in 5 timers worth of time. With the arrival of TOC it seems ppl only care about getting new loot. For me, Algalon was a milestone that I had been craving for a long time. Loot will come and go and will be replaced soon enough, a title (Starcaller!) is something that will last forever.

While I normally don’t write up full out strategies on a fight and try and focus more on kitty aspects, I feel that Algalon does deserve a full writeup. Partially because the job of a kitty is pretty simplistic and there’s not too much to mention but also because the Algalon is all about execution and there are a lot of little things that help contribute to a successful kill.

Algalon the Observer

Algalon has the following abilities that affect your MT/OT.

  • Quantum Strike – Inflicts 15,675 to 17,325 Physical damage.
  • Phase Punch – Inflicts 8,788 to 10,212 an applies a stacking debuff on the target. When the debuff reaches 5 stacks the target is affected by Phase Punch which will shift the target to another plane for 10 seconds.

Algalon has the following abilities that affect your whole raid.

  • Cosmic Smash – Inflicts 41,438 to 43,562 Fire damage to anyone under the area of impact, and less Fire damage to everyone, based on proximity.
  • Big Bang – Inflicts 76,313 to 88,687  Physical damage to anyone not standing inside a Black Hole. Removes players from Black Holes.
  • Ascend to Heavens – Inflicts 655,500 to 724,500 damage to all enemies. Cast 6 minutes after engaging him. Equivalent to Berserk.

Algalon has the following adds that join the fight:

Whoa! That’s a lot of information, lets try and translate this and simplify:

  • Tanks will need to rotate tanking Algalon so that Phase Punch will not stack to 5, we rotated every 3 debuffs. If you miss and a tank is phased out -> you wipe!
  • Cosmic Smash drops a big red void zone (a la Sarth) and everyone needs to move away. If you get hit by it at close proximity you’ll get launched into the air -> you die!
  • Big Bang means everyone (minus 1 tank, explained later) gets into the phased plane to avoid massive damage. Don’t get into the void zone -> you die!
  • Collapsing Star dies -> Black Hole Spawns -> Closed by Living Constellations

General Strategy

Ok, now we’ve gotten all the fight mechanics out of the way and tried to simplify them down as much as possible. Lets discuss how the fight works. Essentially the fight is broken down into 2 phases:

Phase 1

During this phase, 2 tanks are required to rotate on and off to keep the Phase Punch debuff from reaching 5 (we rotated every 3). The real dangers lies in the Cosmic Smash and Adds that spawn during the phase. Cosmic Smash will spawn in a random location (quite frequently in melee/tank range!) and it is imperative that all melee including the tank move out of range. Dealing with Collapsing Star and Living Constellations are also tricky. You need to kill Collapsing Star at an opportune time (explained below) and you also need to use Living Constellations to close the Black Holes that are created. However at the same time, you need to close them at the right pace so that you still have two portals open so that your raid can avoid Big Bang by entering the phased state.

If your raid is executing properly you should experience Big Bang twice throughout Phase 1, once every 90s. During each Big Bang, one of your tanks will have to stay in the normal plan and eat the Big Bang otherwise, Algalon will Ascend to Heavens due to the fact no melee are in range. Your tank will need some sort of damage reduction ability to survive through the Big Bang such as Shield Wall, Guardian Spirit etc

Phase 2

Once Algalon reaches 20% phase 2 will begin. At this point, Collapsing Star and Living Constellations will no longer spawn, but four Black Holes will spawn. Dark Matter will begin to come out of these Black Holes which will need to be offtanked.  This essentially becomes a DPS race to burn down the remainig 20% while not getting overrun by Dark Matter that will continually spawn. In addition, Big Bang will still occur so it’s imperative that you bring him down fast to avoid having to transition through another Big Bang.

General Tips

  • Timing is everything in this fight, the execution of each individual element needs to be spot on to spread damage evenly and to avoid spikes of damage.
  • Announce when tanks are taunting off each other, the amount of damage that Algalon does does not afford you the time to change targets late
  • Do not kill a Collapsing Star if Cosmic Smash is incoming, spread the damage out or someone will get instagibbed
  • Avoid killing a Collapsing Star if you are rotating tanks, switching tanks and suddenly getting hit with additional dmg can cause a tank death
  • Healers should try and stand behind void zones so that if they pull healer aggro, they can kite it (especially resto druids who can move and heal)
  • The OT that is not currently tanking Algalon should be on taunting duty to close Black Hole
  • When Algalon begins his Big Bang cast, ALL healers should check to see if they have aggro on a Living Constellations, I don’t even know how many times a healer walked into a void zone first because they were close and closed it on half the group. If you have aggro, wait for others to enter first then use a aggro dump ability (Fade, Shadowmeld) so that you don’t close the portal on yourself.
  • When you enter the phased plane, I would recommend that you run to the edge of the map and not into the middle of the map to avoid Dark Matter. The reason for this is because there is never a void zone right on the edge of the map whereas if you run into the middle there is a possibility that when you rejoin the normal plane you could have walked right into another void zone and get dumped straight back in.

Kitty Tips

  • As always, blow your Berserk early, if you have aggro issues (and you have a pally) call for Hand of Salvation this should allow you to reuse Berserk again in Phase 2.
  • Before Big Bang is being cast, take a look around you to see where is the closest Black Hole so that you have your route planned out
  • Before Cosmic Smash is being cast, take alook around to find an exit route, don’t walk straight into a Black Hole by accident!
  • Try the best of your ability to put up a fresh set of dots as Big Bang is being cast, so that while you’re phased out, they will continue to roll. If you can time this correctly by the time you leave the phased state and find Algalon your dots should just be falling off (in other words minimal dps loss).
  • Innervate is a healers best friend, now that it’s been pushed down to a 3min CD, use it twice during the fight
  • If you have multiple kitties, try and setup a brez order ahead of time so that you don’t need to communicate who should rez first.

Ever since 3.1 came out, this has been one of my goals to kill Algalon. It was extremely exciting and humourous at times. The attempt before our kill we had Algalon at 1% when he cast a 3rd Big Bang and for some reason everyone entered the phased state and we got instagibbed by Ascend to Heavens (/facepalm). My goal now is to try and get as many ppl experienced at the Algalon fight so that we can push towards Algalon25. From a 25 man perspective we are very close to getting Freya HM and after that we are only missing Firefighter to unlock Alg25. Celestial Defender is still available on our realm and I would really love that title 🙂

I really do hope this helps those who are out there working on this and if you do have any specific questions please feel free to drop me a question in the comments.

Pics to be uploaded shortly! Here’s one for now.

algalon10

wowscrnshot091909013308z

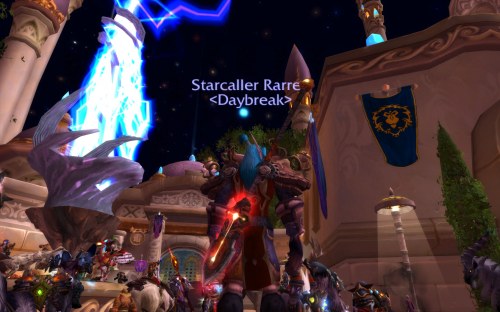
He disappeared before I could get him in the shot 😦

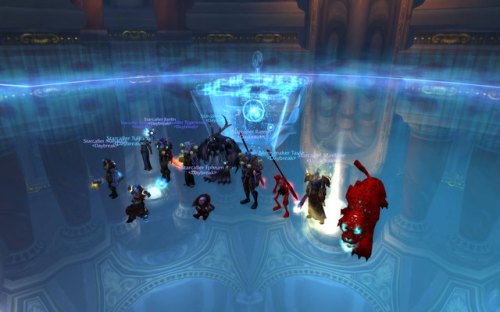
The show in Dalaran!

The show in Dalaran!

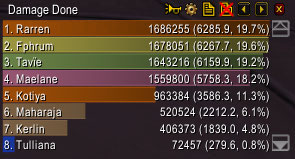
Meters from the fight, Ill try and get WOL next time

Meters from the fight, Ill try and get WOL next time

I love the smell of lobster in the morning

Whenever I see General Vezax I can’t help but think of Red Lobster. It’s like he picked himself up off the cutting board and ran into Ulduar to avenge all his fallen brothers of the sea. His hardmode, I Love the Smell of Saronite in the Morning is probably one of the more challenging achievements in the instance as a whole. However for melee this is probably one of the most boring ones to complete as well as our role is a straight dps race.

General Vezax Hard Mode – I Love the Smell of Saronite in the Morning

This hardmode is activated by ignoring (not killing) Saronite Vapours which are the only source of mana regeneration. Essentially the toughest job in this fight belongs to the healers who are forced to heal the entire fight with the mana pool they have. Once 8 Saronite Vapours have been ignored, they will merge and create a Saronite Animus. During this time, a Saronite Barrier will be cast on General Vezax which reduces 99% of damage done to him. While the Saronite Animus is activate it will cast Profoud Darkness causing significant damage to the raid as well. In other words, the Saronite Animus needs to be killed as soon as possible to remove the shield so you can kill General before your healers run out of mana.

Naturally all other abilities of General Vezax remain active throughout the fight and while the Animus is spawned as well. These abilities need to be managed accordingly:

  • Shadow Crash – Shoots a shadow missile towards a random target (preferring ranged), inflicting 11,310 to 12,690 Shadow damage to the target and anyone in 10 yd radius. A dark puddle spawns under the area of impact, increasing magical damage by 100%, decreasing casting speed by 100%, healing done and mana cost by 75%.
  • Mark of the Faceless – Applies a Mark of the Faceless to a random raid member (preferring ranged), causing them to drain 5,000 hit points every 1 second, for 10 seconds, from other nearby players. The health drained heals Vezax.
  • Searing Flames -Inflicts 13,875 to 16,125 Fire damage to everybody in the room, and reduces their armor by 75%. Can be interrupted.
  • Surge of Darkness – Increases Vezax’s damage by 100%, but decreases his movement speed by 55%, for 10 seconds. Cast every 60-70 seconds.

General Strategy

We tried this in two different ways, each have their pros and cons. Depending on your raid makeup one may be more beneficial to your group than the other but both are viable options.

  • Strategy 1: Use one tank, 3 healers and 6 dps. This will help to burn General down significantly faster which should result in a very low help Gen when the Animus spawns. Kill the Animus quickly and then burn the last few % remaining on Gen. The downside of this is your single tank will need to tank both Gen and Animus during this phase which requires a lot more focused healing on the single tank vs spreading healing across two. As well, having both Gen and Animus tanked on top of each other makes it difficult for ranged to see where Shadow Crash is going to land. We started with this strategy but switched due to the added difficulty of managing Shadow Crash.
  • Strategy 2: Use two tanks, 3 healers, 5 dps. Same as above except the secondary tank will pickup the Animus during that phase. The benefit is less healing focused on one tank and also the ability to position the Animus in a way that will make it easier for ranged to see the Shadow Crash landing. We moved to this strategy and felt this was the easier way. Naturally the downside is a Gen with a lot more health which means this puts a lot more pressure on your healers to manage their mana for an extended period of time.

In addition to the general strategy we used the following setup to help us

  • Healing wise, we had a Resto Shammy, Disc Priest and a Resto Druid. Other setups are possible as well but a disc priest is extremely beneficial for this encounter and a resto druid Omen of Clarity healing is fantastic as well. (Yay free heals!)
  • Having a melee heavy group (which we do) simplifies the fight significantly. Not having to dodge Shadow Crash turns this fight into a straight dps burn. The downside of this naturally is you cannot utilize the benefit of Shadow Crash puddles to increase dps.
  • A minimum of three raid members must be at ranged to manage the Shadow Crashes (preferably ranged dps). All other melee/healers should be right on his Lobster tail to minimize any Shadow Crash failure and provide a little bit of melee damage as well, every little bit helps!
  • Setup a movement path for Shadow Crash, if you get hit, there should be a designated path to exit (left, right, back etc)
  • If someone dies to a Shadow Crash during the Animus Spawn, have a backup that is ready to move out into ranged to take their place. If this does not happen General will Shadow Crash someone within melee and essentially cause a wipe. It is absolutely imperative that someone have good reaction speed to make this adjustment if required.

Kitty Tips

  • Berserk early so that it will be up again while the animus is spawned.
  • Don’t interrupt if you don’t have to, interrupting screws with our dps mechanics way too much and shouldn’t be done unless there is no other option.
  • This is strictly a dps race that has no change in mechanics for a kitty. While other people in your raid have to deal with additional mechanics you are free to continue like normal.  This goes without saying but I’ll say it anyways, maximize your dps to the best of your abilities!

genhardmode


I’m Retired!

As of 04/04/2011, I have officially retired from WOW. This blog will remain as a archived resource for those who know that CAT DRUID IS 4 FITE!

About Me

A blog for the ramblings and thoughts of Vallen, a full time raiding cat druid from Auchindoun-US with a passion for raiding & achievements. An avid wow player since 2004.

For any questions or concerns contact me via comments or e-mail

Achievement Points
12250
Flying Mount
Mimiron's Head
Mount
Amani War Bear
Shirt
Master Builder's Shirt
Title
Commander
Tabard
Tabard of the Lightbringer

Blog Statistics

  • 463,970 hits